General User Guide
CLEANGROW MULTI-ION BLUETOOTH PROBE QUICK START GUIDE
This guide will help you to start using your multi-ion probe.
Please read carefully before beginning
Bluetooth probe user guide:
PRECAUTIONS: The probe is not waterproof. Do not submerge the button/usb end in liquid, only the sensor tips. Do NOT touch the tip of the sensors.
DO NOT MEASURE De-Ionised WATER!
Charge the probe for a few hours/overnight with the USB cable
If the probe has been stored or unused condition for 20 minutes at least until the mV data on the settings tab is stable
Turn on the probe by pressing the button for 2-3 seconds
Go to the settings tab. Connect or reconnect the probe to your device
Select your solution set e.g. S3mg NB! or the calibration will not be correct
Select your probe type depending on what you ordered eg M67 (see appendix 1)
Go to the calibrate tab
If it’s your first use or after sometime you will not be able to calibrate until you press condition.
For conditioning, calibrating; follow the on screen guide (conditioning re-hydrates the sensors)
To measure a sample, go to the Test tab
The probe will auto power down after 5 mins if the app is closed on your phone/ipod/device or the dis/connect swirl is pressed
To manually turn off the probe, hold the button for >5 seconds until no light flashes
To put the probe away, swirl in DI water, shake off excess water, place the cap back on and store in the protective case.
Any questions at all, if you are unsure about anything, pop an IM to cleangrow by skype (look up cleangrow) or google hangouts or email
Failure to follow these steps or measure anything but an aqeous sample or outside of reasonable temperatures and pH will invalidate warranty and returns process
On first use after purchase, test it works by measuring solution 2, the expected results are on the bottle. If we don’t hear from you we will assume it is working on arrival, we test all kits prior to shipping on an individual basis.
Downloading the app:
look on google play or the appstore for cleangrow (v2)
Note: When moving from one solution to the next, dry the outer body of the probe to avoid carry-over of drops diluting the next solution.
Be gentle with it!

Support details
If you need further assistance or would like to purchase additional probes, sensor tips or calibration solutions, please e-mail us on info@cleangrow.com or visit www.cleangrow.com
You can view all of our user manuals and documentation at: http://www.cleangrow.com
FAQ - What can go wrong and what to do about it
THE FIRST thing anyone should do is go to settings screen and look at the mV data
(obviously the probe should be on and the probe in the conditioning or calibration solution)
All the mV should be stable up to the decimal point, eg 41.xx mV
What do the calibration colours mean?
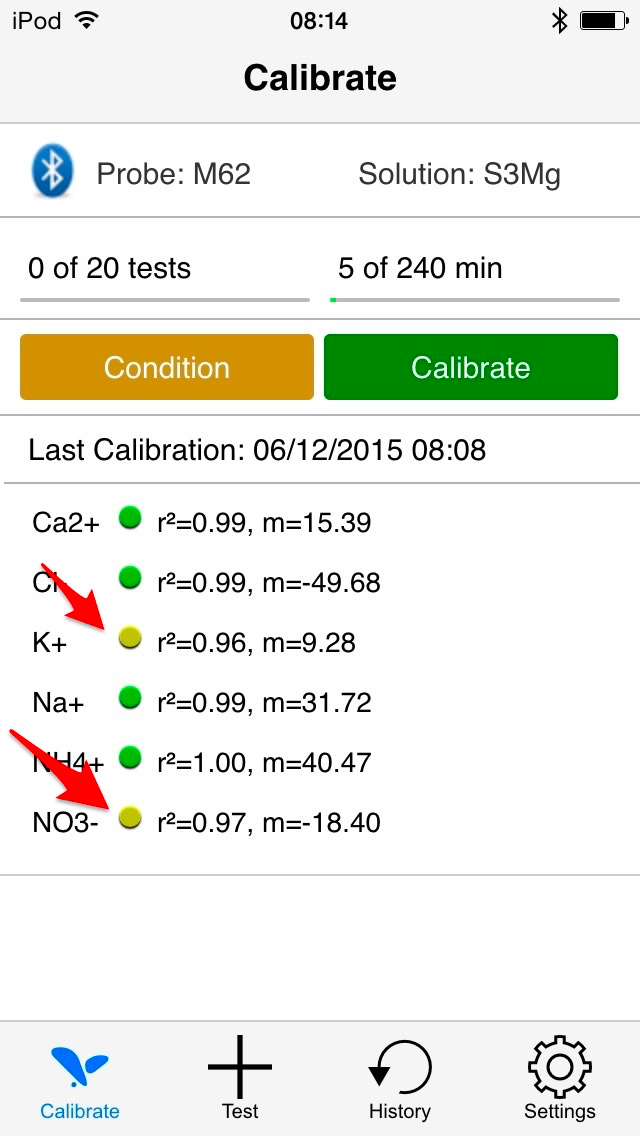
A line of best fit on a calibration curve is represented by an r2 value, When r2 equals 1.0, all points lie exactly on a straight line with no scatter,
A green dot indicates the values obtained for the 3 calibration steps resulted in a straight line graph
Orange indicates an r2 of less than 0.98 to 0.96
A red indicates too much of a deviation from a straight line.
Reasons why the calibration may not be green
The calibration solutions have become diluted from drips carried over during the calibrations -change them from the large bottles
The batteries have become weak reducing power to the Bluetooth signal resulting in erratic calibrations - change them.
less common but the reference electrode could be damaged - go to the settings tab on the app :you will see the mV screen. This is the raw data coming from the probe- it should be stable; ie the whole numbers should not be moving hardly at all.
If it is the same sensor every time not calibrating : It is likely that the sensor itself is faulty or the hardware has become faulty. Contact us at support support@cleangrow.com
How to get to best calibration
On first use of the day let the probe sit for a few minutes to acclimatise-condition. Swirl the probe in the solution to make sure any bubbles of air are dislodged
Stand the probe in the bottle and don't move it while it is being calibrated
while moving from one bottle to another, dry off the drips by gently shaking the probe and then dabbing it with a cloth or tissue on the outside. DO NOT touch the sensor tips with anything.
How to get the best data
Use appropriate calibration solutions for your application (more detail on this later)
After calibration take a test (i.e. measure) the middle calibration solution, you should get roughly within 10% of the values on the back of the main bottle. If not check for drift on the settings tab mV screen. The sensors could need more conditioning. Give it a 5 minute soak and try again
A good idea is if you have a lab verified sample - keep some back and use it to check the sensor readings. keep this sample nearby for future use with its data .
Why all the different calibration solutions.
Ions need to be calibrated just like pH. The main difference being that the H+ Ion data in pH is written as the log of the concentration which is the pH range 1 → 14
Therefore when calibrating a pH probe the user will choose a 2 or 3 point calibration.
If choosing a 3 point the user will cover the whole range by a 4, 7 and 10 buffer range .
If the end user knew their samples are always around eg. pH 5.5 They might choose a 2 point using buffers 4 and 7.
Ions of course are usually measured as PPM or mg/l Or mmol and can cover a huge range.
The calibration solutions for our multi ion probes must contain all the ions and in a ratio and ionic strength similar to the end users target e.g. hydroponics fertiliser, water from rivers and lakes in environmental analysis. Soils analysis.
We make calibration sets to cover the most frequently measured samples in the real world based on feedback from our customers since 2010.
Warranty
The sensor tips are covered under warranty for 6 months against manufacturing defects.
We will not accept responsibility if the sensors are used in anything other than water based samples containing ions, for example sugar based drinks, organics, volatile hydrocarbons etc.
The electronics are covered for one year against manufacturing defects.
We will not accept responsibility for damage caused by accident, misuse, submergence in water of the electronics end or similar.
Appendix 1
Probe types
Sensor Combinations
M62 [Ca2+, Cl-, K+, Na+, NH4+, NO3-]
M63 [Ca2+, Cl-, Mg2+, Na+, NH4+, NO3-]
M64 [Ca2+, Cl-, K+, Mg2+, NH4+, NO3-]
M67 [Ca2+, Mg2+, K+, Na+, NH4+, NO3-]
M68 [Ca2+, Cl-, K+, Na+, Mg2+, NO3-]
NPK2 [Ca2+, K+, Mg2+, NH4+, NO3-, PO43- ] *not available yet
Solution type
Application specific
S3mg Horticuture/soil based samples
S5mg Lower range young plants/soil samples
SSEAW seawater applications e.g algal culture
SWWAT Wastewater-ground water, environmental analysis
Related Articles
Using the CG200 Auto analyser
In the box: 2 5l containers of calibration solution 1 and 2. The main unit. When you set it up, put the inlet tube for cal 1 into the cal 1 bottle and the same for tube 2. Then plug it in it will boot up with a cleangrow screen. Then if you have a ...